Trigger over MQTT
This tutorial shows you how to remotely trigger your OV20i camera using simple MQTT messages. In just a few steps, you'll have a system that can capture and process images from anywhere on your network - no complex programming required!
What You'll Build: A simple remote trigger that lets you start camera inspections by sending a basic message over your network.
Estimated Time: 20-30 minutes
Skill Level: Beginner
Real Example: Imagine a button on an operator's tablet that instantly triggers the camera to inspect a part - that's exactly what we're building, but using MQTT messages instead of buttons.
Prerequisites
Before starting, make sure you have:
- OV20i camera connected and working
- A recipe set up and ready to use
- MQTT communication configured (see "MQTT Communication Setup" guide if needed)
Your camera trigger must be set to Manual in Imaging Setup - this tells the camera to wait for your remote commands instead of capturing automatically.
Why MQTT Triggering is Easy
The OV20i makes remote triggering simple:
- No coding required - just drag and connect a few nodes
- Works instantly - send a message, get results immediately
- Reliable messaging - MQTT ensures your commands reach the camera
- Any device can trigger - tablets, computers, PLCs, or sensors
Perfect for: Remote inspection control, automated production lines, or any situation where you need to trigger the camera from another location.
Step 1: Quick Camera Check
1.1 Set Camera to Manual Trigger
- Go to your Recipe Editor
- Click "Imaging Setup"
- Find Trigger Mode and set it to "Manual"
- Click Save
Why Manual? This tells the camera "wait for my command" instead of taking pictures automatically.
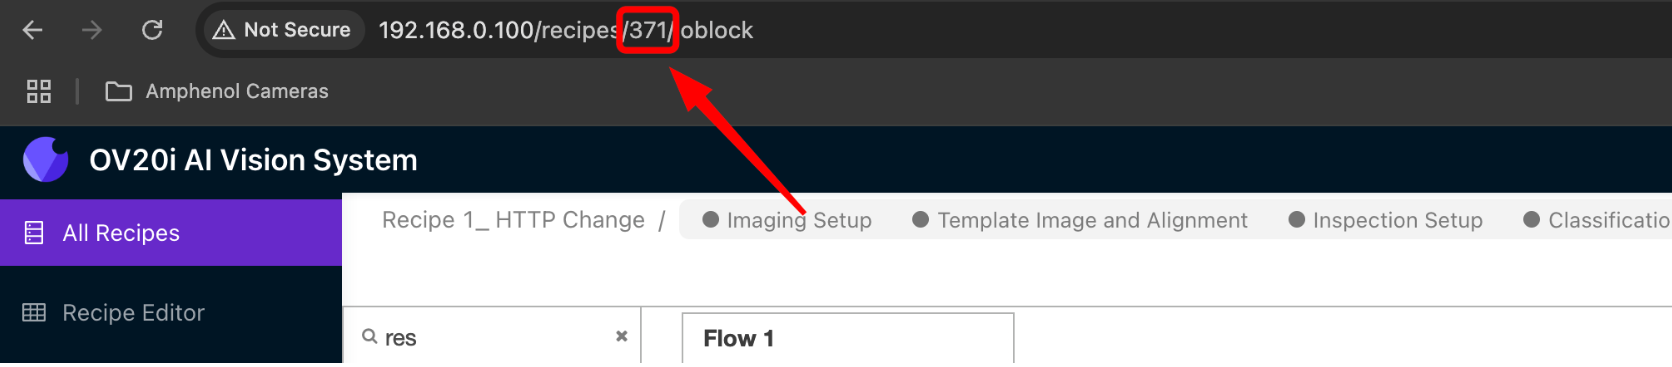
1.2 Find Your Recipe Number
- Look at your browser address bar while in Recipe Editor
- Find the number after
/recipe/(example: if URL shows/recipe/10, your recipe number is 10) - Write this number down - you'll need it in a few minutes
Step 2: Open the Flow Builder
2.1 Get to Node-RED
- In your Recipe Editor, click "IO Block"
- Click "Configure IO"
2.2 Start Fresh
If you see other nodes on the canvas, that's fine - we'll just add our new trigger flow alongside them.
Let’s begin!
Step 3: The Simple Secret to MQTT Triggering
Here's all you need to know: The camera needs 2 quick messages to take a picture remotely.
- First message: "Hey camera, get ready for a remote command"
- Second message: "Now take a picture!"
3.1 Drag These 5 Nodes onto Your Canvas
From the left panel, drag these onto the main area:
- Inject (from Input section) - This will be your "trigger button"
- Change (from Function section) - For message 1
- Delay (from Function section) - Tiny pause between messages
- Change (from Function section) - For message 2
- MQTT Out (from Network section) - Sends messages to camera

Step 4: Configure Your Nodes
4.1 Set Up Your Trigger Button
- Double-click the Inject node
- Change the name to "Remote Trigger"
- Click "Done"
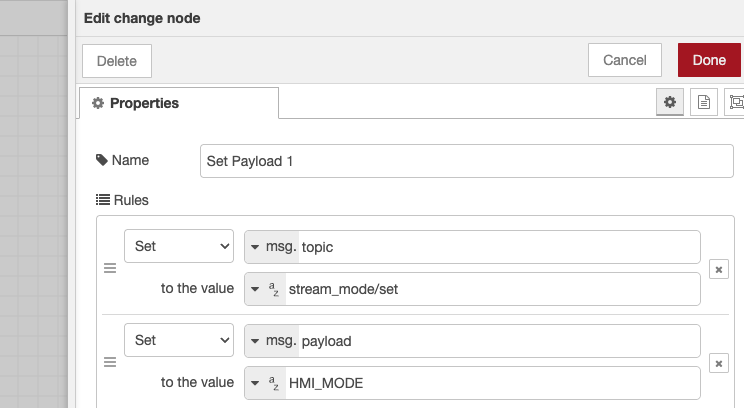
4.2 Set Up Message 1 (Get Ready Command)
- Double-click the first Change node
- Change name to "Get Ready"
- Click "Add" and select "SET"
- Set
msg.topictostream_mode/set - Click "Add" again and select "SET"
- Set
msg.payloadtoHMI_MODE - Click "Done"
What this does: Tells the camera "get ready for a remote command."
4.3 Add a Small Delay
- Double-click the Delay node
- Set delay to 10 milliseconds
- Click "Done"
Why? Just gives the camera a split second to get ready.
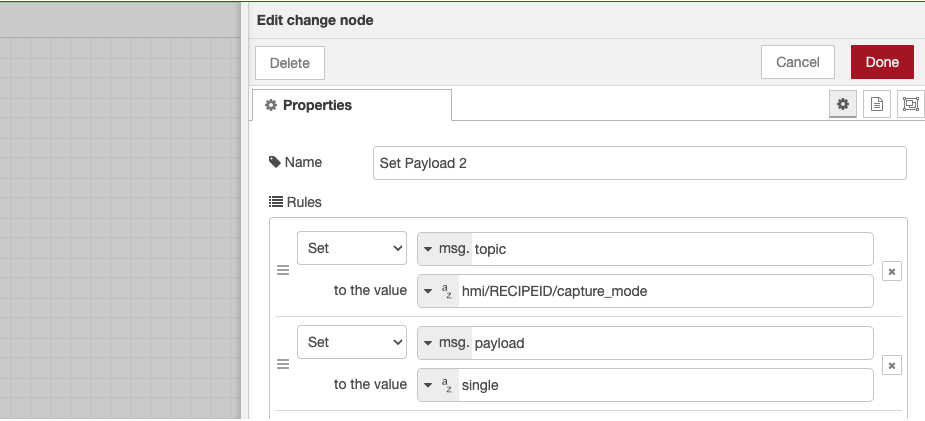
4.4 Set Up Message 2 (Take Picture Command)
- Double-click the second Change node
- Change name to "Take Picture"
- Click "Add" and select "SET"
- Set
msg.topictohmi/[YOUR_RECIPE_NUMBER]/capture_mode - Replace [YOUR_RECIPE_NUMBER] with your actual number (like
hmi/10/capture_mode) - Click "Add" again and select "SET"
- Set
msg.payloadtosingle - Click "Done"
What this does: Tells the camera "take one picture now!"
4.5 Set Up the Message Sender
- Double-click the MQTT Out node
- Select your MQTT broker (should already be configured)
- Change name to "Send to Camera"
- Click "Done"
Step 5: Connect Everything Together
This is the fun part! Now we connect your nodes to create the flow.
5.1 Make the Connections
Draw wires between nodes like this:
- Remote Trigger → Get Ready → Send to Camera
- Remote Trigger → Delay → Take Picture → Send to Camera
Visual guide:
Remote Trigger ──→ Get Ready ──→ Send to Camera
      │
      └──→ Delay ──→ Take Picture ──→ Send to Camera
5.2 How to Connect Nodes
- Click and drag from the little square on the right side of a node
- Drop the wire onto the left side of the next node
- You'll see a gray line connecting them
Step 6: Test Your Remote Trigger
6.1 Activate Your Flow
- Click the red "Deploy" button in the top-right corner
- You should see "Successfully deployed" message
6.2 Try It Out
- Place a part in front of your camera (for testing)
- Click the button on your "Remote Trigger" node
- Watch your camera take a picture!
Success signs:
- Camera LED flashes briefly
- You hear the inspection processing
- New image appears in your Library
6.3 Check Your Results
Go to your Library page - you should see a new image with a recent timestamp. Click on it to see the inspection results!
If it worked: Congratulations! You just remotely triggered your camera.
If not: Check the troubleshooting section below.
Step 7: Use It from Other Devices (Optional)
Want to trigger from your phone, tablet, or another computer? Here's how:
7.1 From Any MQTT App
Download any MQTT app and connect to your camera's IP address on port 1883, then:
- Send first message:
- Topic:
stream_mode/set - Message:
HMI_MODE
- Topic:
- Wait a moment, then send second message:
- Topic:
hmi/[YOUR_RECIPE_NUMBER]/capture_mode - Message:
single
- Topic:
7.2 From Command Line
On Windows/Mac/Linux:
# First message
mosquitto_pub -h [CAMERA_IP] -t "stream_mode/set" -m "HMI_MODE"

# Second message (replace 10 with your recipe number)
mosquitto_pub -h [CAMERA_IP] -t "hmi/10/capture_mode" -m "single"
That's it! Your camera will take a picture from anywhere on your network.
Step 8: Validation and Testing
8.1 End-to-End Testing
Complete workflow validation:
| Test | Action | Expected Result | Status |
|---|---|---|---|
| Manual trigger | Click inject button | Image captured and processed | ☐ |
| HMI mode activation | Check camera status | Camera switches to HMI mode | ☐ |
| Inspection execution | Verify processing | Debug shows inspection results | ☐ |
| External trigger | Send MQTT command | Remote triggering works | ☐ |
8.2 Performance Validation
Monitor these metrics:
- Trigger response time: From MQTT message to image capture
- Processing duration: Time to complete inspection
- Result delivery: Debug output timing
- System reliability: Consistent triggering over multiple tests
8.3 Production Readiness
Before deploying to production:
- Test with actual parts and inspection conditions
- Verify integration with your external systems
- Confirm network reliability for MQTT communication
- Document trigger topics and message formats
Step 9: Quick Troubleshooting
Not working? Here are the most common fixes:
9.1 Camera Doesn't Take Pictures
| Problem | Quick Fix |
|---|---|
| Nothing happens when I click trigger | Check that your recipe number is correct in the "Take Picture" node |
| Camera takes picture but no inspection | Make sure your recipe is Active and has a trained model |
| Trigger works sometimes | Verify trigger is set to Manual in Imaging Setup |
9.2 MQTT Issues
| Problem | Quick Fix |
|---|---|
| Red dots on MQTT nodes | Check MQTT broker connection in your setup |
| Deploy button is grayed out | Click anywhere on the canvas first, then try Deploy |
| Nodes won't connect | Make sure you're dragging from the little square on the right side |
Still stuck? Double-check that MQTT communication is set up correctly (see the MQTT Communication Setup guide).
You Did It! 🎉
Congratulations! You now have remote control of your OV20i camera. With just a few clicks, you built a system that can:
- Trigger inspections from anywhere on your network
- Work with phones, tablets, computers - anything that can send MQTT messages
- Integrate with other systems like PLCs, sensors, or custom applications
- Scale to multiple cameras by using different recipe numbers
What's Next?
Now that you have the basics working, you can:
Easy Next Steps
- Test from different devices using MQTT apps
- Create multiple triggers for different recipes
- Add this to your production workflow
Advanced Ideas
- Connect to PLCs for automated production lines
- Build custom apps that trigger multiple cameras
- Add result forwarding to send inspection data elsewhere
- Create operator dashboards with trigger buttons
Real-World Examples
Here's how others use MQTT triggering:
- Quality Control Stations: Operators scan a barcode, system triggers camera inspection
- Conveyor Lines: Sensor detects part, automatically triggers inspection
- Manual Inspection: Tablet with simple "Inspect" button for operators
- Production Monitoring: Central system coordinates multiple cameras
The possibilities are endless - and it all starts with the simple system you just built!